


Plastic Injection Molding Process Overview, Step by Step
THE PLASTIC INJECTION MOLDING PROCESS
The stages of the plastic injection molding process are considered when analyzing parts design, tool creation and efficient production of molded plastic parts & products. This article glosses over some details and covers the basics.
S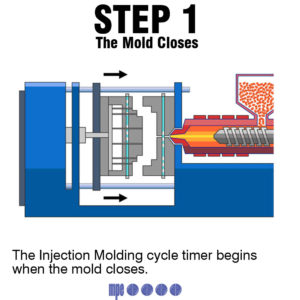 TEP 1: THE MOLD CLOSES
The Injection Molding cycle timer begins when the mold closes — note that in some cases, the cycle begins and ends when the machine receives a new part or the new part hits the conveyor belt.
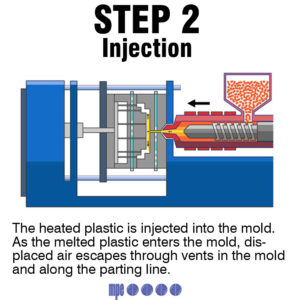 STEP 2: INJECTION
The heated polymer is injected into the mold. As the melt enters the mold, the displaced air exits through vents in the injection pins and along the parting line. Runner, gate and vent design are important to insure the mold is properly filled, every time.

STEP 3: COOLING
Once the mold is filled completely, the plastic part is allowed to cool for the just the amount of time required to harden the material.
Each mold is carefully designed with internal cooling or heating lines where water is cycled through the mold to maintain a constant temperature. Highly engineered polymers may require heated oil for higher cooling temperatures.
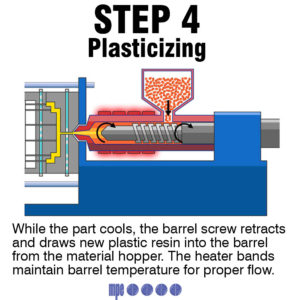 STEP 4: PLASTICIZING THE RESIN
While the part cools, the barrel screw retracts and automatically draws new polymer resin into the barrel from the material hopper. The heater bands maintain the needed barrel temperature for the type of resin being used to ensure proper molding.
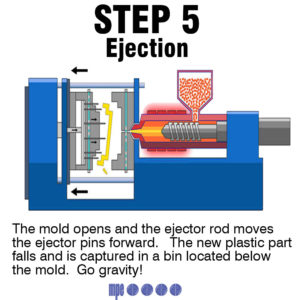 STEP 5: EJECTION
The mold opens and the ejector rod moves the ejector pins forward. The beautiful new plastic part falls and is captured into a bin located below the mold — go gravity!
STEP 6: REMOVING THE RUNNER & PACKAGING
After the injection molding machine’s last step ended, the process continues cycling to create new parts — and periodically the equipment operators or robots, separate the usable parts from the left overs runner. The runner is the pathway or “runway” that the hot plastic takes to fill the mold cavity. Often, the runners are ground and recycled to reduce costs and environmental impact. The completed parts are then inspected for quality — weight, size, etc. Then off to assembly or shipping.
We hope you enjoyed learning the basic steps of Plastic Injection Molding. Check back soon for more technical information relating to mold design, mold making & injection molding.